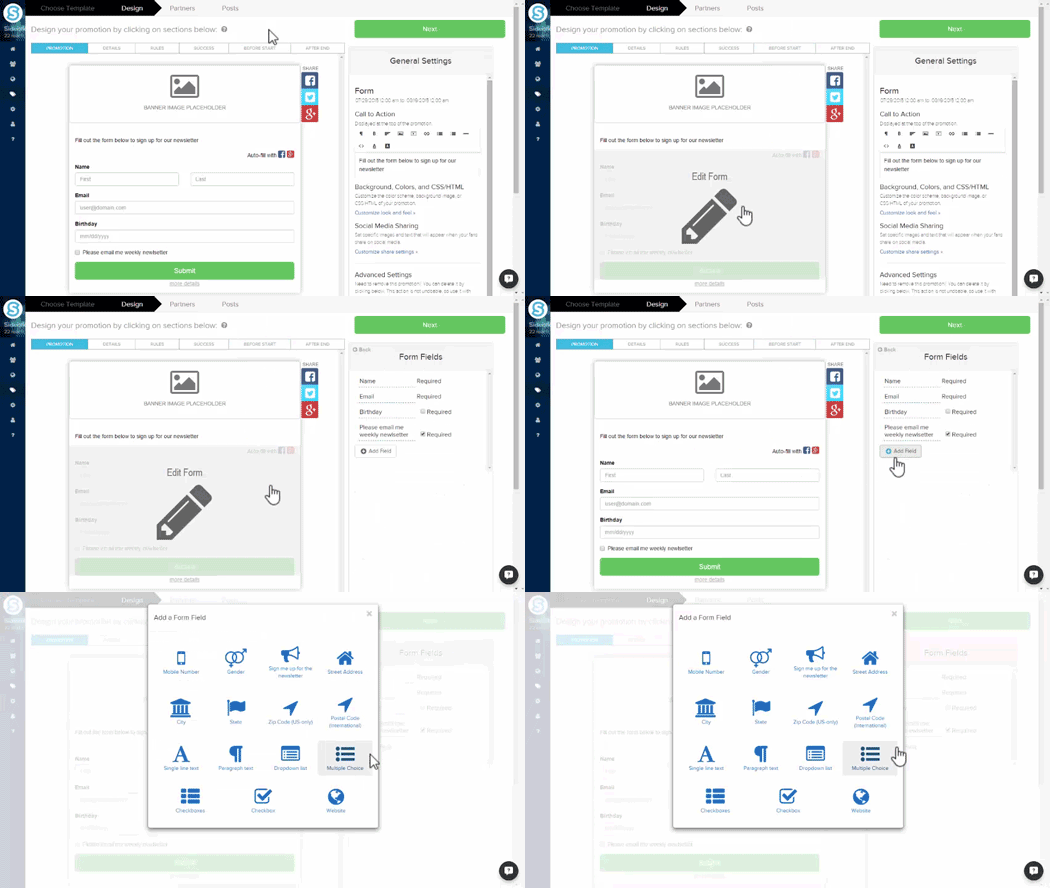
The "Design" stage of your Promotion allows you to customize what your fans see on your landing page. For a "Simple Entry Promotion" the pages available to edit are:
Promotion
Under the "Promotion" tab you see the initial landing page for your Promotion. You can select to edit each section individually. By hovering over the specific segment and clicking you will be taken to the option to edit:
- Banner Image
- Call to Action
- Social Sharing
- Form
Form

By default the fields on your Simple Entry Promotion will be the same as those on the template you initially chose. To edit the name of any field, click the current name of the field and you will be able to edit in a separate text box. To confirm the changes click the blue checked box, to cancel your edits click the white crossed out button.
You can add fields to your promotion by selecting the "Add Field" button at the bottom of the edit Form window. To reorder the fields in your Simple Entry Promotion, hover over the multi-direction arrow to drag and drop the field. To remove a field, hover over the selected field and click the "Remove Field" button which is a minus symbol inside of a circle. Choosing to remove a field will have an additional pop-up clarifying your decision, if you remove a field during an ongoing Promotion all data recorded using that field will be lost.
To make an individual field required for your promotion, click the check box next to the field name. The Name and Email fields will always be required and cannot be deleted. When you select to add a field you will be given the option to add the following fields once:
- Mobile Number
- Birthday
- Gender
- Newsletter Sign up
- Street Address
- City
- State
- Zip Code (US only)
- Postal Code (International)
- Country
The following fields can be added multiple time:
- Single Line Text
- Paragraph Text
- Drop-down List
- Multiple Choice
- Check-boxes
- Check-box
- Website
- File Upload
These fields will initially be listed as "empty" when added and require renaming. For the "Drop-down," "Multiple Choice" and "Check-box" options, each line added in the text box will be a separate choice in the field.
Details
The Details tab is where specific additional information about your promotion can be found. The Details section should be a more in depth Call to Action, and give your audience more information about the form in your promotion and what their information will be used for.
Rules
The Rules tab is where specific information and legal documentation can be viewed about your promotion. If your promotion is open to a specific age range or location that information would be written under the Rules tab.
Success
The Success page will show to any fan who has successfully entered the correct information into the required fields of your promotion. To change the Success page, select the "Success" tab from the toolbar located at the top of the promotion preview. The social sharing options can also be accessed from the Success page.
Before Start
The Before Start page is the default landing page to be displayed prior to your promotion officially beginning. The Before Start page has a countdown timer displaying the days, hours and minutes left before the start date and time set for your promotion. To edit the Before Start page, select the "Before Page" tab from the toolbar located at the top of the promotion preview, and replace the text in the right side bar with your own message.
Limit By Country
The "Limit by Country"check box allows you to pick winners by location. If you Promotion is only eligible to winners in the US and Canada, by entering "United States" and "Canada" into the drop down menu under the check box the selected winner will only be selected from those who are from those countries.
If you are limiting the availability of your Promotion it is important to get this information from your audience through a required "Form Action." Any entry without an attached country will not be chosen if the "Limit by Country" check box is selected.
Click Here to read more about picking winners for your Promotion.
After End
The After End page will be displayed to any fan who visits your promotion's landing page after the end date. To edit the After End page, select the "After End" tab from the toolbar located at the top of the promotion preview, and replace the text located in the right side bar with your own message.
Customization for Each Promotion Type:
« Step 1: Create a Promotion│ Step 3: Inviting Influencers »
Comments
0 comments
Please sign in to leave a comment.