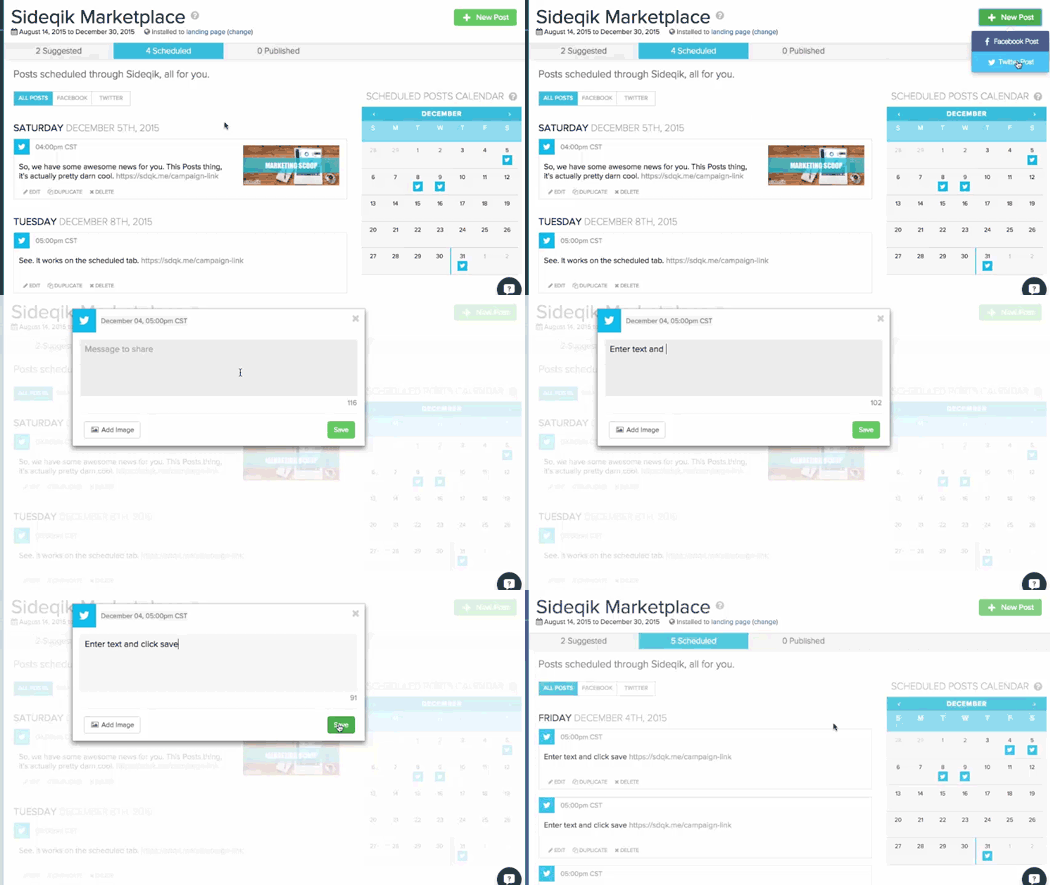
Sideqik allows you schedule and edit posts quickly and easily at any point during your campaign.
Creating and Scheduling New Posts

- Step one: Click "New Post" and select Twitter or Facebook
- Step two: A pop up will open allowing you to create and schedule posts for your campaign. These posts will be suggested to your influencers.
- Step three: While creating the post you can decide if you want your post to go to:
-
- All influencers pages including your page
- A specific influencer’s page
- Just your brand’s accounts
Just click on the "Post to" box and a drop down bar will allow you to choose who you want the post to go to.
- Step four: Add text
- Step five: Add a photo by clicking on the image icon in the left corner of the post box. We automatically resize Facebook images so that you can see how the image will look on Facebook.
- Step six: Click on the date by the image icon to set when and what time you want the post to go out
Once you have created the post press the “Save” button. On the next screen you will see a checklist of what needs to be completed before you activate your promotion.
Editing and Rescheduling Social Posts
Under the "Posts" sections of your Promotion's dashboard you are given the options to add, edit or reorganize your social posts. You can also see the previous social posts which have already been published and which partners have approved the post.
Edit Posts
To edit an existing post, you can either do a quick text edit by hovering over the text box and clicking within the text or click the edit button at the bottom right corner of the post.
To change the image on a scheduled post, drag an image from your image library over to the desired post. If you want to change to an image which is not currently in your image library, by clicking the edit button in the bottom right of the post you will be able to upload a new image from your computer.
Reschedule Existing Posts
To change the date and time of an existing post you can either click the currently scheduled time in the bottom left corner of the post or click the edit button in the bottom right of the post and select the date and time from there.
To re-order posts manually, you can drag each post individually by hovering over the post and click holding the multi directional arrow which appears in the upper right area of the post. This will change the date the the scheduled post will appear on. The time of the post will remain the same, but can be changed by clicking the the in the bottom left of the post staging window.
Post Schedule
The calendar displays the scheduled posts and duration of your promotion. The arrows on the top bar of the calendar display will cycle between the 12 months of the year. To schedule a post for a specific day of the week, clicking on the desired date in the calendar, a new post text box will appear allowing you too create and edit a new message on the date selected.
Image Library
The "Image Library" displays images uploaded from your computer. Dragging an image from the image library to a post will automatically attach the image to the post. If the scheduled post already has an image attached, the dragged image will replace the previous one.
Comments
0 comments
Please sign in to leave a comment.